
This is a last picture of it before it left with a new owner.

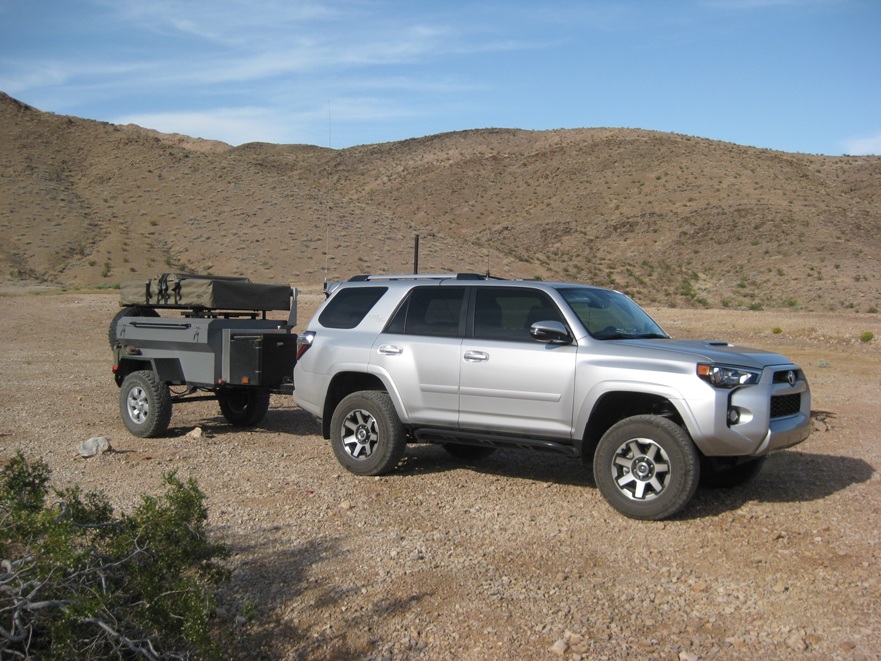
Here is the replacement! A 2018 Toyota TRD Off Road Premium with a factory rear locker, crawl control and multi-terrain select features.

Lots of upgrades are in the works including sliders, better suspension, dual battery setup, beefier rear lower control arms, roof rack and more. I'll be updating this post as I make progress on the modifications.
I took off the suspension from the old 4Runner and sent it to the factory for a rebuild with new seals, springs and so on.

The rock sliders from the old 4Runner need a small modification so that they fit well on the new 4Runner.
I spent time in the garage measuring and cutting then will have a shop weld on a small 2" square plate over the opening.


The sliders' four mounting U-bolts have been cleaned and repainted.

I also cleaned and repainted the rear springs and the rear lower control arms.


Front of the sliders have been welded. They'll need a bit more cleanup and lots of paint.

Suspension install is almost complete. The "old" swaybar relocation brackets will not work on the new 4Runner so I ordered a new set. Otherwise the front coilovers, rear coil springs, rear shocks, bumpstop spacers and heavy duty lower control arms are all installed.


Lift installed!

Sliders are clean and repainted, ready to bolt up!

A few late afternoon shots of the install.


Each of those round openings is a spot to place a HiLift Jack where it won't slip when lifting the truck.

A view down from the driver's side door.

The offset blocks for the swaybar have been installed and I now have the swaybar back into the 4Runner.
The block goes in first and serves to move the swaybar a little forward so as not to contact the coilover.

Here is what it looks like with the OEM Bracket and swaybar reinstalled.

Today I fabbed a front license plate holder that is down below the bumper. Keeps the LEOs happy but I avoided drilling holes in my nice front bumper. I also installed my aftermarket end links for the rear swaybar.
Here is the stock one in position

Here is the reconditioned aftermarket link next to a stock one. The extra length is to get the swaybar back into alignment after the install of the taller rear springs.

I came up with a simple way to mount my ScanGuage II in a spot that allows unobtrusive yet easy viewing. This entailed making a simple mounting bracket out of thin aluminum and also some of the time-honored Velcro strips to allow removal for cleaning or other issues.


The cable for the OBD-2 connection routes next to the steering column. If I can find a right angle adapter I may be able to use the ScanGuage's rear port and lessen how much the cable hangs out in the open.
For the air compressor install above the driver's side fender well it is necessary to relocate a small electronics module as well as a small box that contains three relays.
The module was moved from the top of the fender well to an existing bracket for the braking system.

The relay box is normally fastened to the side of the fuse box and it has a series of channels that allow it to slide onto the fuse box's molded in bracket.

I made up a small plate out of aluminum and fashioned three "fingers" of aluminum that slide into the channels on the relay box. This new plate fastens to the wall of the engine bay above the fender.

This is the relay box fastened onto the new plate.

Here is the compressor's bracket fastened to the base plate.

This view shows the dense foam vibration absorption layer between the metal plates.

How the compressor looked on the plate during a test fit.

Compressor is intalled! The pressure switch and outlet are screwed in too.

Next project was to install the Tekonsha Prodigy P2 brake controller for handling the trailer's electric brakes. Similar to the last 4Runner there is a good spot on the bottom left of the dash. Toyota has the truck pre-wired with a connector so as to make it an easy plug-n-play install. Most of my efforts centered around the mechanical installation which meant opening up the dash. Always hard to tear into a new car!

Here is the P2 installed.

Second battery bracket was installed in the engine bay, passenger side.

The battery is actually an Odyssey PC1500 that was private labeled for Sears as a DieHard Platinum. Almost 5 years old and seems to be doing well.

This battery will be used for the fridge and the two way radios. It is maintained by a CTEK 250SA Dual.

The D250SA is a fully automatic, 5 step charger that supplies up to 350 Watts of power to any 12V lead acid service battery from 40-300AH, including AGM. It has selectable charge voltages for AGM batteries and can use power through its dual input from alternator, solar panel and wind power. When the service battery is fully charged, the D250SA will automatically redirect maintenance charge power to the starter battery. The D250SA can maintain a stable output up to 20A to vehicles fitted with smart ECU controlled alternators and also has a temperature sensor for optimised charging, regardless of weather conditions.
- 20A fully automatic temperature compensated charging for batteries from 40-300Ah while you’re on the move
- Dual input (solar and alternator in parallel)
- Battery separation replacing diodes and VSR relays
- Solar panel regulator with Maximum Power Point Tracking (MPPT)
- Selectable AGM option – 14.4V or 14.7V
- Maximized charging for better battery life and performance
- Temperature sensor to compensate for hot or cold conditions
- Splash and dust proof (IP65)
For running the fridge and radio I ran 2 cable pairs to the 4Runner's cargo area. What the area looked like before disassembly.

In order to route the wires I had to pull the interior panels off. The small metal box is the factory 117vac supply (inverter).

Bringing the power wires and radio cables out from behind the panel for connection to the modified AC Outlet Panel.

Here is the Toyota AC Power Outlet Panel modified for a LED readout DC Voltmeter, dual Anderson PowerPole outlet and high quality cig lighter socket. The meter pulls less than 0.009 Amps so I just leave it on all the time.

Radio is installed and plugged into the PowerPole outlet. I also modified the Engel Fridge power cord to use an Anderson PowerPole.

First time out with the new 4Runner and off road trailer in the Mojave Desert!
New tires! These are the Falken WildPeak AT3W replacing the stock Dunlop street tries. They are 265/70R17 and weigh only 7.5 pounds more per tire.


Here is a comparison shot which emphasizes the tread pattern the Falken offers for better offroading performance over a street tire.

The new tires have been performing very well

On the 2005 I had some Total Chaos skids for the lower front A-Arms. I repainted them and installed them on the 2018 4Runner
Left

Right
